

Have you ever viewed a LabVIEW VI Hierarchy and become frustrated with not being able to locate a VI you needed to open?
Do you have large applications composed of similar modules but fear jumping, with both feet, into the learning curve of LVOOP?
Did you ever try to duplicate a sub-VI at the start of a new set of functions and find yourself deep in a nest of cross-linked VIs, or save a VI only to realize that the most suitable name has already been used?
Then using LabVIEW Libraries may be useful to you (see Figure 1)!
Figure 1. Application Development using LabVIEW Libraries
Libraries are a feature available in the LabVIEW project or they can be created stand-alone*. They have a number of features that allow you to specify shared properties and attributes of related VIs and custom controls. A partial list of the features of a LabVIEW project library is shown in Table 1.
| Feature Type | llb | lvlib | Object |
| Common Icon | No | Yes | Yes |
| Logical Grouping | Yes | Yes | Yes |
| Access Scoping | No | Yes | Yes |
| Name Mangling | No | Yes | Yes |
| Cloning | No | Yes | Yes |
| Hierarchy Grouping | No | Yes | Yes |
| Dynamic Dispatch | No | No | Yes |
Table 1. Features of Project Libraries Ccompared with llb and Objects
In short, many of the features of LVOOP are available without the complications required for Dynamic Dispatching. The remainder of this document will serve as a tutorial that demonstrates how to create, define, and clone a library. Additional notes are included to illustrate how these features can be exploited to help you develop more robust applications that are easier to support than applications that do not use libraries.
*Libraries can be created stand-alone from the LabVIEW splash screen using the method:
File >>> New … >>> Other Files >>> Library
Creating a Library
You can create a new library from the project by right-clicking the “My Computer” icon and selecting “New >>> Library” (see Figure 2). Save it to a unique folder that will contain all of the files associated with the library.
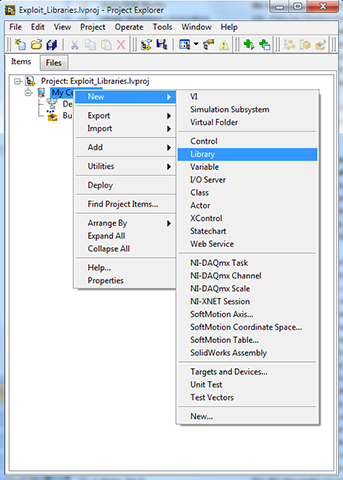
Figure 2. Creating Library
Open the properties screen (see Figure 3) and then open the icon editor (see Figure 4) to compose a Common Icon for the library and its members.
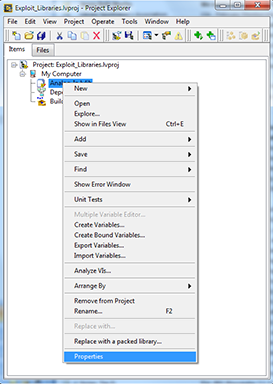
Figure 3. Opening the Properties Screen for a Library
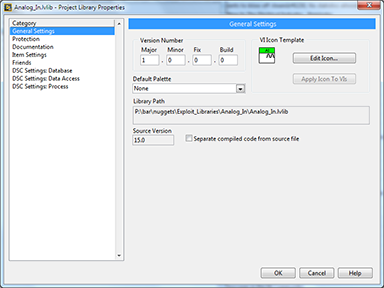
Figure 4. The library Property Screen has a “Edit Icon…” Button That Will Let You Create an Icon
Take a little time to create the icon because it will be shared by all of the members of the library. Do not get carried away and fill-up the entire icon. Leave some white space so that the icons of the component VIs can be customized to illustrate their role in the functionality of the library.
Create virtual folders in the library (see Figure 5) to help organize the VIs contained in it. I usually use three folders but you can use more or less depending on your needs and preferences. I use one to hold the controls, and another pair for the public and private VIs. I do not use auto-populating folders for a number of reasons.
- I can control which VIs are included and which are not. Occasionally temporary VIs are created to do some basic testing and they are never intended to be part of the library. If functionality changes and the temporary VI breaks due to the change, the library may cause a build to fail due to the broken VI.
- I can easily move a VI from private to public without having to move the VI on disk and then properly updating source code control to reflect the change.
- I can keep the file paths shorter using the virtual folders while maintaining the structure in the project.
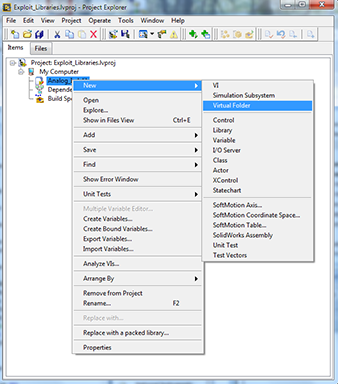
Figure 5. Adding Virtual Folders to a Library
Additional virtual folders can be added if you want to further break-down the organization of the VIs in the library. If developing a library that will be used by other developers and or be as a tool for others, you may want to include a folder for the VIs that define the API your library offers. The API can also be divided into additional virtual folders to break-down the interface into functional areas if you wish. Implement the Logical Grouping of sub-VIs as needed for your library.
Set the Access Scope of the private virtual folder to private (see Figure 6). While the private folder and the setting of the access scope can be optional, taking advantage of this options will help you and the users of your library identify which VIs are not intended for use outside of the library. Attempting to use a VI with private scope from outside the library itself will break the calling VI and make it very obvious that the VI is not intended for public use.
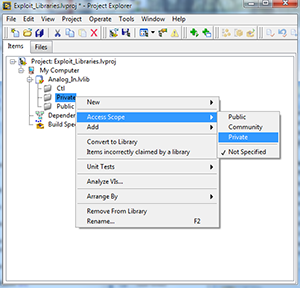
Figure 6. Setting Access Scope of the Virtual Folders
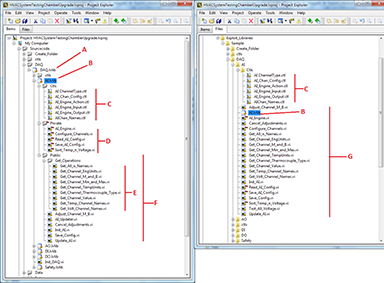
Figure 7. A Typical Project Using Libraries to Group Related VIs Shown in Both Item and Files View
In Figure 7, I share a screen shot of a typical project that uses libraries. Some notes for the annotations in Figure 7 follows.
A. I used nested libraries (one or more libraries contained in a library) to make it easy to slice off large portions of the project files that were latter used in other project.
B. The library containing all of the Analog Input related VIs is named “AI.lvlib”.
C. The Controls virtual folder holds all of the type definitions used by the library. They can often be ignored when looking for the sub-VI we need, but when we have to revise one of the definitions, they can be found quickly.
D. The Private virtual folder contains the low level VIs that are required by the library but are not intended to be used directly in an application. Setting the Access Scope to private ensures that any use of those VIs by VIs that are not members of the library will break the calling VIs. Drawing on a quote from an old map often mentioned in the world of LabVIEW “There be dragons there.” Please note the small red key symbols shows the VIs that are marked as private scope.
E. In a nested virtual folder contained in the public virtual folder, all of the available “Get” operations are grouped to make it easier to find the functions we need.
F. The Public folder contains all the VIs that are available for use by the main application and components.
G. All members of the library are located in a single folder.
Developing applications using libraries differs little from developing without libraries with one exception; there is no additional work to use them. The exception is illustrated in Figure 8 where the name of the VI is highlighted. While the VI named in the project is shown as “Init_AI.vi” the actual name of the VI is “DAQ.lvib:AI.lvlib:Init_AI.vi”. The difference is the result of what is called “Name Mangling”. The actual name of the VI is prefixed by the library names that own the VI. This is a powerful feature that goes a long way toward avoiding cross-linking and will let us easily clone a library to be used as the starting point of a similar library.
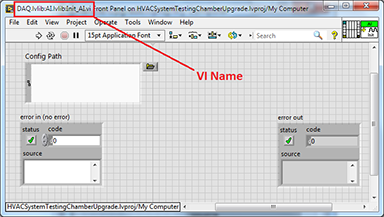
Figure 8. The Effect of Name Mangling on a VI Name
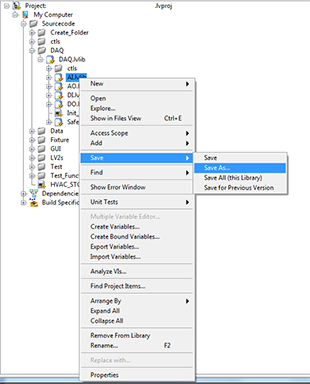
Figure 9. Use Save >>> Save As… to Clone a Library
When we clone a library (see Figure 9) we start to harness one of the nice features of a library.
The Save as screen for the library (see Figure 10) will not only let us define the library name but also where in the project the library will be placed. This is handy for nested libraries but not critical. The libraries can be moved around in the project or between libraries as need using the project window. When a library is cloned using the Save As option, all of the VIs contained in the original library are duplicated and re-linked to the VIs in the new library. There is NO chance of cross-linking when Cloning a library!
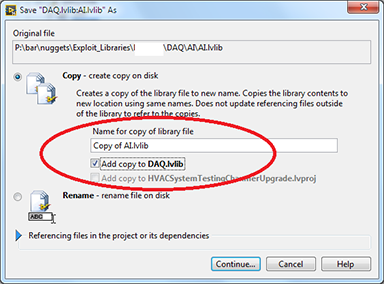
Figure 10. The Save as Dialog Allows us to Define the New Library Name
Once the new library has been created I normally will adapt the icon to the purpose and modify VI names to be consistent with the new library. I do have one note of caution to offer before you decide to clone a library. It is a good idea to create a stand-alone tester for all of the functionality supported by the library. Give some thought to possible changes or enhancements as well. Cloning libraries is a great technique that will save you time with the development of subsequent clones provided you have met all of the functional requirements. If we clone a library too early in the development process and overlook common functionality, we may have to duplicate changes made to one library in all of the clones created from the original library.
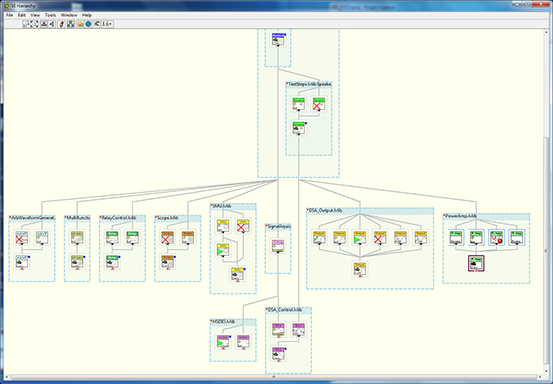
The power of libraries saves us work during the initial development phase but it does not end there. They are also useful when debugging or making modifications required to properly support the application. Relying on the LabVIEW Project window alone can become cumbersome in large applications where there could be thousands of VIs. The VI Hierarchy screen offers a presentation that lets us view what components interact and depend on other components. Viewing the hierarchy of a large application can also be a challenge when trying to find the function we need to investigate (see Figure 11).
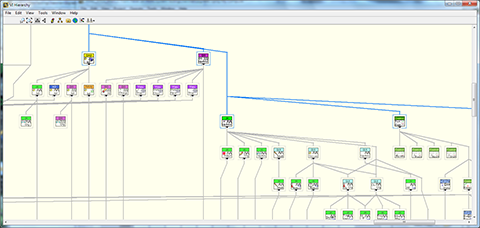
Figure 11. The VI Hierarchy Screen can be Hard to Navigate for Large Applications
When we use libraries to group our sub-VIs we can take advantage of a feature built into the hierarchy screen. As highlighted in Figure 12, we can engage the “Group Libraries” button which will redraw the hierarchy with members of the libraries grouped together. The grouping of library members lets us see all of the functions enclosed in a light blue box with the name of the library in the top left corner. The grouping also lets us see the similarity between the organization in the project and their usage.
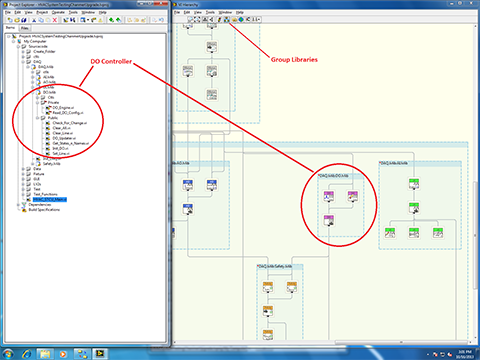
Figure 12. Libraries can be Grouped in the VI Hierarchy Screen
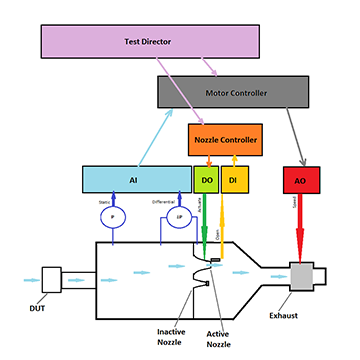
Figure 13. The Design of the Application Shown in Figure 14
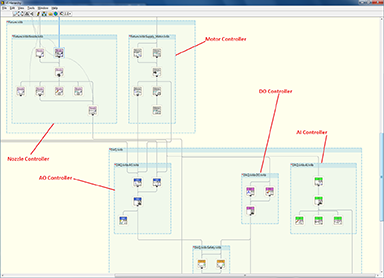
Figure 14. Hierarchy of Application Shown in Figure 13
The benefits of libraries may not end with us, but may extend also to those that follow and find themselves having to dive into an application with an understanding of the overall operation. Comparing the high-level design shown in Figure 13 and the hierarchy shown in Figure 14, we see that it is not very difficult to quickly add another nozzle to the test fixture. Each of the components of the real system maps to a virtual version in the project.
Summary
Libraries can help in all phases of an application from initial development to long-term support through to knowledge transfer. Remember, “Libraries” are your friend!